
The perfect home extruded pasta dough is simple to make and only takes 2 ingredients, water and flour! For me, I prefer using a semolina dough when I am extruding pasta. This will give you a flavor closer to dried pasta. You can use an egg dough for extruded pasta but it will have a different texture. There are very few recipes out there for a semolina dough for home extruders, such as the Kitchenaid. I find many are too wet or contain eggs.
This recipe was designed to work perfectly with KitchenAid’s Pasta Extruder and Antimo Caputo Semolina flour. (As an Amazon Associate I earn from qualifying purchases)
The most important aspect of getting this dough right is the hydration percentage. This will vary based on your flour and machine. I use a Kitchenaid pasta extruder with Antimo Caputo Semola flour. I find a 40% hydration works best with these two. Note that if the dough is too dry it could damage the pasta die or machine. If the dough is too wet, the shapes will be deformed and too soft. When extruding you know the dough is perfect when you can cut it off with a plastic bench scraper.
This recipe is for the perfect base of any extruded dough. You can add other ingredients to the liquid portion, such as pumpkin, tomato, chili powder, etc.
For shaped pasta, like fusilli, you may need to reduce the hydration to 35%.


Extruded Pasta Dough
Description
Freshly extruded semolina pasta dough at home.
Ingredients
Instructions
-
Make the dough
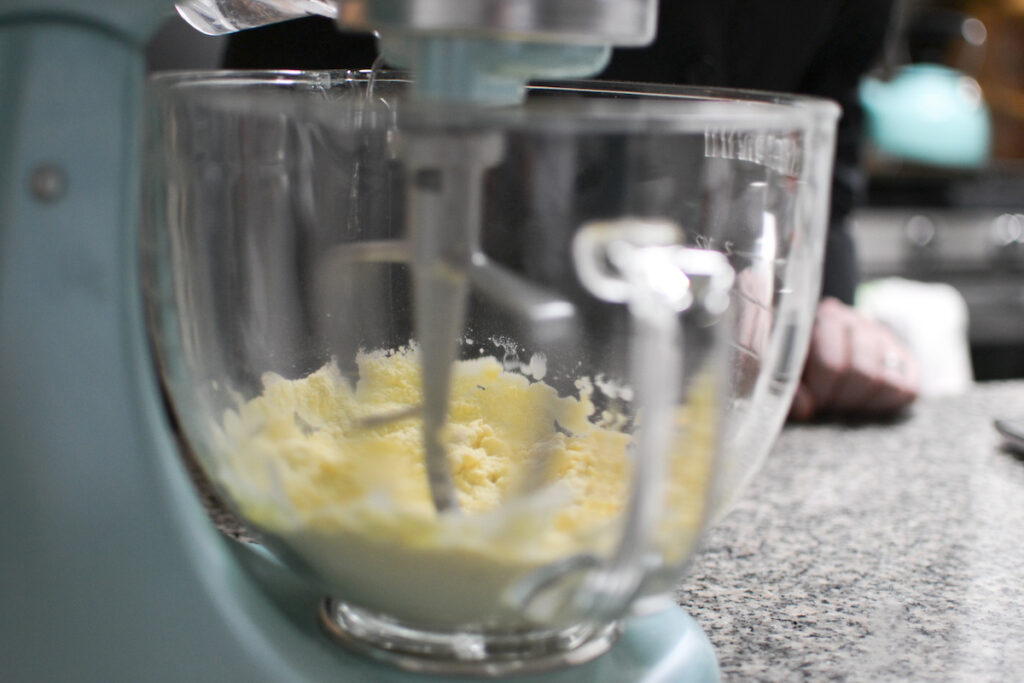
In a stand mixer with a paddle attachment add the flour. Turn the machine on low and slowly drizzle in the water. Continue mixing on low for 5 minutes to allow the water to fully absorb.

-
Check consistency
The dough should resemble wet sand. When folded into a ball it should hold its shape but loosen back into a sand consistency when crumbled. If the dough is too dry add a splash of water, if too wet add a touch more flour.

-
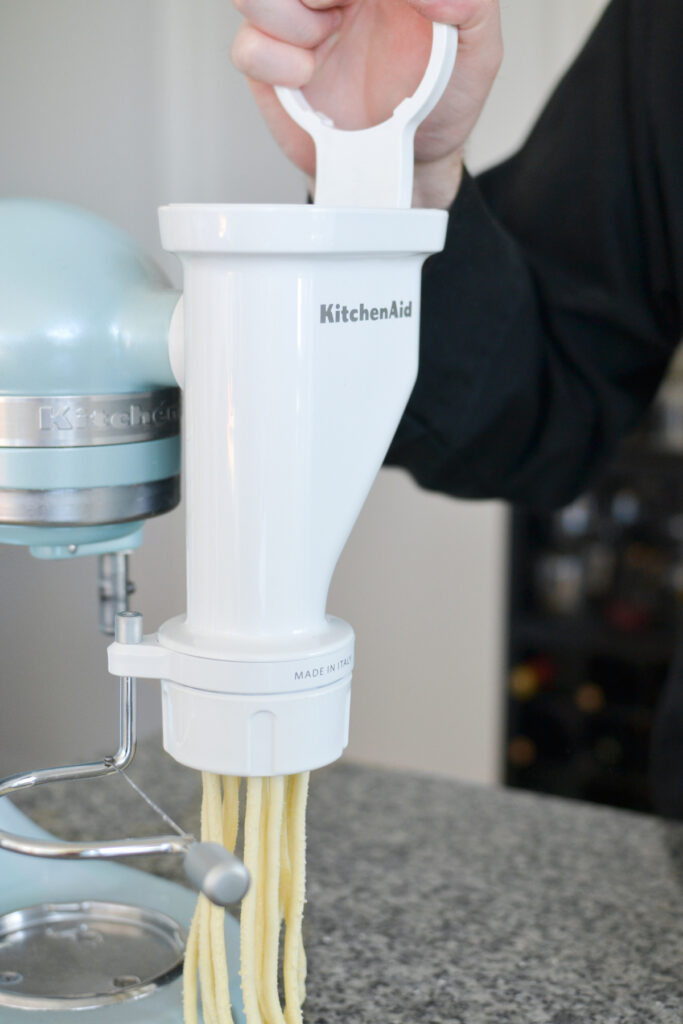
Extrude the dough
This step will depend on your machine. For a Kitchenaid, they recommend forming the dough into balls and feeding through the hopper. The first few inches will be deformed. This can be fed back into the hopper. As the machine heats up it will start to extrude a smoother dough.
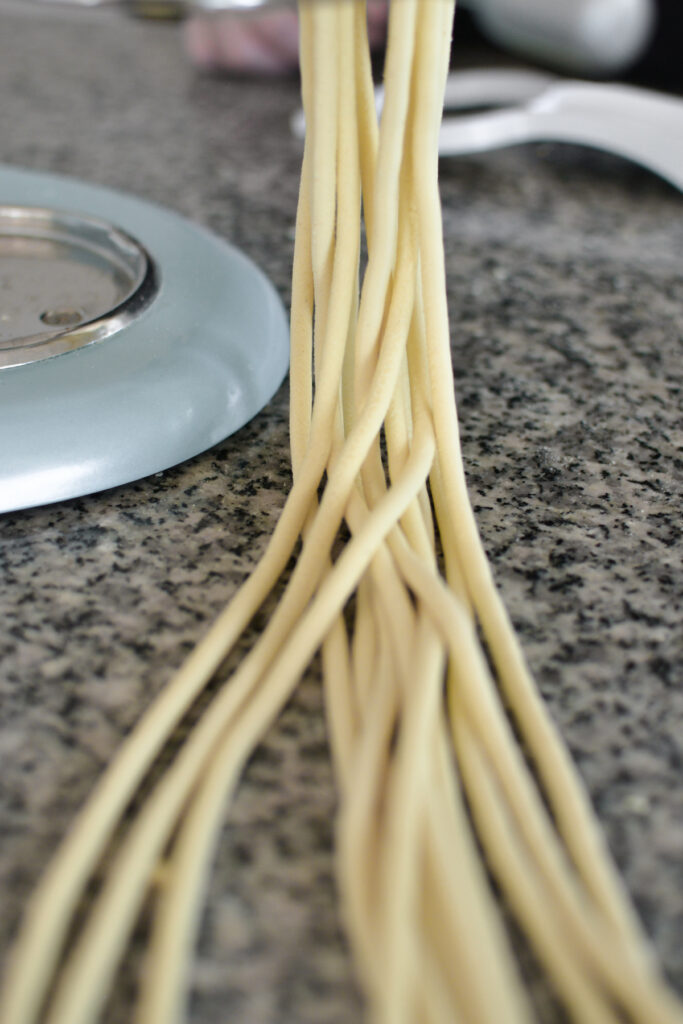
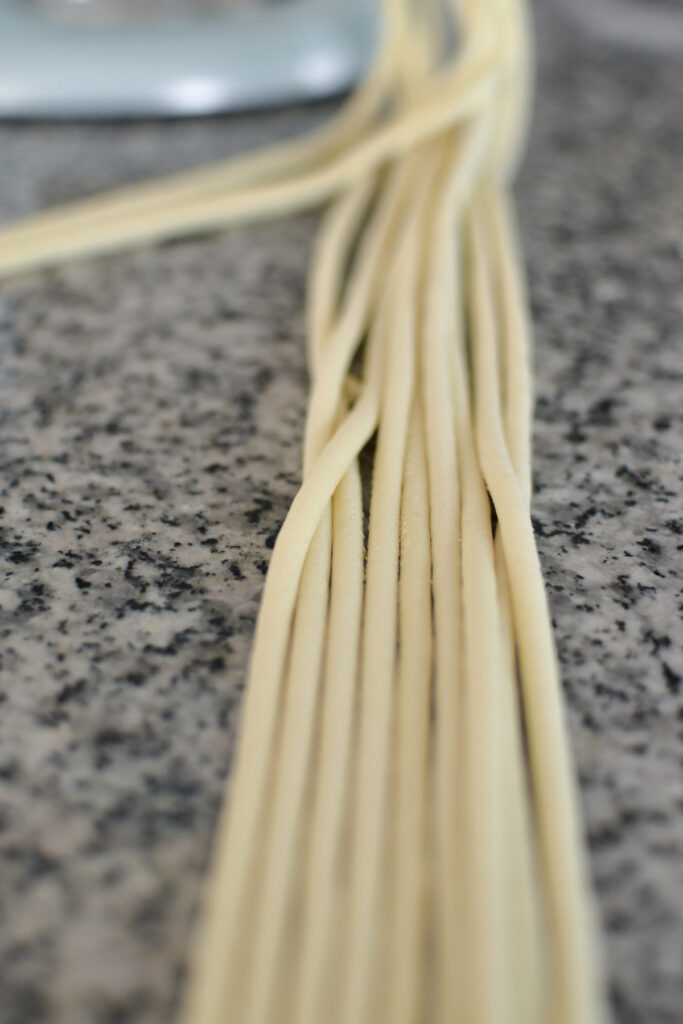
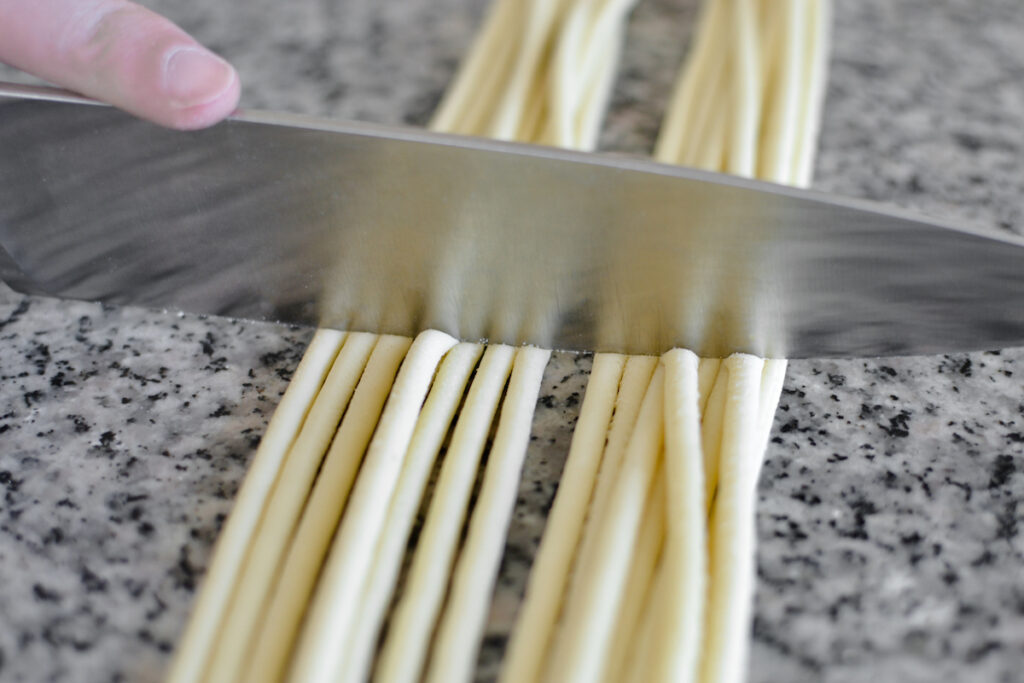
Cut the dough into desired length and let dry for at least 15 minutes.
Fresh pasta will cook in around 2 minutes if fresh. If fully dried it will take a bit longer and depend how dry the pasta is.

Note
For pasta inspiration check out our recipes here!


I just made this dough with my Kitchenaid extruder, and it turned out great! I even substituted half the flour for AP (50%semolina 50%All Purpose.) thanks for posting this!
Glad to hear you enjoyed it, happy pasta making!
Do you let the dough rest before extruding?
Great question! Although it is not necessary to let extruded pasta dough rest, you could cover and let rest for upto 30 minutes.
Happy pasta making!
Thanks!
I always let my pasta dough rest for 30 minutes, whether printed or not. Good rule of Thumb.
Just wanted to say thanks for this recipe! So many recipes called for egg and from my past experience extruding pasta in a restaurant, I knew it wasn’t what I wanted. 40% was a great starting point for me, and I ended up around 38% hydration which could be attributed to any number of conditions like humidity.
In short, thanks!!
Thank you for the kind words, I’m glad you enjoyed the recipe! I agree, almost all recipes I found called for eggs which isn’t right for extruded.
Happy Pasta Making!
Thanks so much for the recipe. I have tried so many others and they never work properly for fusilli. This is the only one that actually works! I am stoked! I did end up around 38% hydration.
I am glad you found the recipe helpful! Thank you for the details on the hydration, I will add it to the recipe to help others as well!
Happy Pasta Making!
It works very well!! Finally, I have found the proper proportions! It is dry at home (32%), so the 40% water ratio worked like a charm. I tested with rigatoni. The first ones were quite curved, but once the extruder head was warm (due to friction, I guess), they started coming out straight. I did 400 grams of durum; it gave me two large baking sheets I put in the oven at a “dehydration” setting. Question: shouldn’t we add some salt to the recipe?
Amazing, I am glad the recipe worked and you enjoyed it! You are exactly correct, even with professional machines they need to heat up to start extruding nice pasta. What I do is put the first few extruded pieces back into the hopper so not to waste it. Great question on the addition of salt! Traditionally salt is not added to pasta dough, especially extruded. Salt makes pasta elastic (and is the trick to making su filindeu that I will be posting soon) and would impact the extrusion.
Happy Pasta Making!
I must add that switching from an Artisan to a Pro makes a huge difference with the extruder.
Thanks, I am.doing this for the first time. Your recipe sounded and proved perfect. I extruded rigatoni for drying, and of course, eating. Looks perfect.. boiking water now…
Question, how to dry for future use? Some sites say 12 to 24 hours, some tell you to refrigerate. What can you advise me about this?
Great question! I have left them to dry up to 24 hours on the counter with success. However, depending on the humidity and temperature they could split in half. The safest way to store them is in the freezer. If frozen, just add directly to the boiling water without thawing. I find the refrigerator cam sometimes lead to an off taste or flavor.
Glad you enjoyed the recipe and happy pasta making!
Thank you!!! Great website and I appreciate your reply. Almost put them in the fridge. Whew.
I just read the newest comments and they are almost spot on my question. Made Rigatoni I dehydrated in the oven for four hours (we have a dehydration function). First two meals were perfect. I cooked some tonight, two weeks later, and almost all of them split after a few minutes in the water! I had kept them in a plastic bag. So, dehydration time was too short? Plastic bags are not a good idea? Thanks
I would suggest freezing in plastic bags. Commercial style dried pasta is a rather complex science and has exact temperature and relative humidity cycles. I find that home dehydration does not keep pasta well past a couple days and will cause splitting.
Thank you Marc. Great learning here. So, do you freeze right away or do some dehydration first?
What I do is let them dry for an hour or up to overnight then freeze. This will preserve the texture and prevent cracking.
I’ve had my kitchenaid attachment for probably 10+ years and only used it the one time (with the included recipe, ergo disaster lol). Tried tonight with this recipe (prob closer to 38% hydration because it’s wet and rainy out) and it was perfection! I rested the dough for about 30 mins. Also, my oven has a dehydration mode so I used that for 30 mins to dry the pasta while I was prepping the sauce.
I am thrilled to hear you enjoyed the recipe and are using your extruder again! No eggs and the proper hydration make the world of difference!
Happy Pasta Making!
I am about to give up on extruded pasta. I used Semolina with 40% and all it did was gum up in the Kitchen Aid extruder. I made another batch with 35-38% and it would not extrude. Seemed too dry but still gummed up the extruder. I am using Caputo semolina. Did not have this problem with Bob’s Red Mill. Maybe I need to switch back, but it is expensive.
Thoughts?
Hi John,
Sorry to hear your pasta is not turning out! What was the consistency of the dough like before it was extruded? Was it like a sandy texture or more dough like? I assume you are using a KitchenAid, it has to warm up and can take 5 minutes or so to start extruding smoothly. Which pasta die did you use?
Also happy to help troubleshoot your dough directly if you want to reach out to contact@marceats.com and provide some pictures.
Happy Pasta Making,
Marc
Hi Marc,
Would you be able to give a recipe for an egg based dough?
My dilemma is I can’t buy both the roller/fettucine attachment and the extruder attachment (don’t have enough space). Given what the family mostly eats and because the extruder purportedly can make spaghetti, I thought let’s get the extruder. I have not purchased either and am still researching, but really want to get something that I can use for an egg based nice and rounded spaghetti.
Hi,
Great question! While I don’t have a recipe posted yet, I will work on getting that up in the coming weeks.
For an extruded egg dough you would want ~40-43% hydration. For a serving of 4, I would say:
400g semola
160g egg (plus water to get to 160. This should be around 2 eggs and you could use a yolk or water to get to the rest)
5g olive oil
We will have an official recipe soon, thanks for the suggestion!
I find that the 40% hydration is a bit too wet — forms well but sticks together
Thanks for the feedback! Hydration can be tricky as it depends on the type of flour, humidity and other factors. I would recommend reducing the hydration by 2% at a time until you find the perfect amount that works for you.
Do you have any experience with, or advice for, making extruded pasta using a Torchio model B hand crank pasta extruder? I have been using one of these. I like it a lot but, when I use straight 100% semolina flour I get a dough that is extremely difficult to extrude. It takes serious muscle and I’m afraid that I will strip the threads on the screw. It’s been much easier to extrude when I’ve used an egg dough, but I would prefer to make 100% semolina pasta. I’ve had very little success searching for semilina pasta recipes for extruded dough. Plenty for rolled out dough or for egg dough, but not what I’m looking for. In fact, your recipe is the only one I’ve found.
Thank you for reaching out! I have not used this model but am familiar with it. Are you using Semola or Semolina flour? Semola is double milled semolina and a bit finer, which causes it to need less water and extrude nicer. You should need a bit of force to extrude, but nothing too crazy. I would suggest increasing the water in 3% increments and see how that works. You may have to go as high as 50%, but it depends on the flour and your environment.
Thank you for the suggestion. This is encouraging. I’ve been using a coarse ground semolina at 38% hydration but I have a bag of semola rimacinata. I will try that and experiment with hydration.
thanks for the recipie! most recipies i found where either with eggs, or with all purpose flour which isn’t right for extruded pasta or are all imperial units and often where needlessly complicated. Pasta is simple just like this recipie, thanks!
Glad you enjoyed the recipe! Exactly, one of the reasons for posting was it is very hard to find a semolina and water extruded recipe for the home machine. Some shapes are just not meant to be used with eggs.
Happy pasta making!
Have been looking for a successful extrusion pasta, and like so many others, all I came across were pastas loaded with eggs and olive oil, which I don’t believe is traditional, and it isn’t what I wanted.
Did a small test (100g semolina), as I’m tired of wasting good flour on recipes that aren’t what I’m looking for. Just finished cooking sixteen rigatoni’s (i have another 16 drying and a third 16 in the freezer…all for testing purposes)and husband and I both agree: This Is Perfect! He has asked me to make a full recipe this afternoon for dinner, so off I go!
Thank you for sharing this recipe!
I am thrilled to hear it turned out! Yes, that is exactly why I started my journey to nail this recipe because it was so hard to find a good recipe, especially for the kitchenAid! Happy pasta making!
I’ve been using your recipe for almost a year now, and I feel I should share one small edit I’ve made over the past several months that seems to help: after mixing the dough for 5 minutes, form it into a ball, wrap in plastic wrap and let it sit for about 30 mins-one hour. This seems to allow the moisture to more evenly spread thru dough, and reduces the number of deformed first passes…..in fact, today, I was able to use the first out! Also, do NOT be tempted to put larger balls thru the feeder, the smaller the balls, the better the appliance is able to extrude the dough.
Again, thank you for this and so many other great recipes! ♥️ your site!
Excellent suggestion, I’ll have to give that a try! Thank you for sharing and your kind words!
Happy Pasta Making!
You knocked out out of the park with this recipe for our KitchenAid pasta extruder. We’ve struggled with egg based body’s recipes with all purpose flour and have ended up with pasty noodles. This will be our new go to recipe.
Thank you so much for the kind words and I am thrilled you found it helpful! The lack of recipes for the KitchenAid extruder without eggs is what led me on my quest to develop this recipe.
-Happy pasta making!
Yesterday I used my marcato regina extruder for the first time, and because it was the first time I followed the recipe in the instructions booklet, assuming they would know best!
The recipe was 250g 00 Flour, 250g Semolina, 5 eggs.
The result was that it was very very difficult to produce any shape that held its form, or that didn’t stick to its neighbours and become a unified shape with the other items cut at the same time. Also even the cutter was struggling to chop the pasta cleanly!
I have previously made busiate by hand with semolina and water based dough so interested to read your recommendation, and I plan to try again tonight!
I’m curious, I initially bought this machine to try and make my own fresh egg fusili, rigatoni, bucatini as I buy from the shop, as I use them so much. Do you think there is any middle ground / compromise to be had between a dryer semolina rich recipe, but also including a smaller amount of egg in the dough? I assume it must be possible as I buy it and eat it but am confused by the recommendation in the instructions manual!
Thanks for posting
Great question! While it is possible, it is much tricker to make an extruded egg dough at home. I am still working on perfecting my recipe for it, but the one you provided seems way too hydrated. I would suggest including the weight of the eggs into the final hydration percentage. I would start with 35% hydration then increase/decrease based on the consistency. However, from what I understand about the marcato regina it isn’t as powerful as the KitchenAid (or the popular phillips) so be extra cautious as too little hydration may crack the plastic inner piece. I would assume that is why their hydration looks closer to 50% (which is what I use for hand made semolina shapes) and 60% for fresh egg pasta.
I have a question can I prepare make the dough and immediately freeze it for later use?
Great question! You can certainly freeze the pasta after making it, and that’s the best way to preserve it. However, you canny freeze the dough before extruding as it won’t thaw properly and will get too wet to work with.
I have used the KitchenAid extruder for many years and was frustrated that there weren’t any new shapes. I recently found a site called Pastidea.com that makes brass dies in dozens of shapes and has an adapter that works for the KitchenAid. They are made in Italy, not that expensive and ship quickly at a reasonable cost. The only drawback is that since the adapter moves the die down, the built in cutter won’t work. You just have to pay attention and run a sharp knife across when you have the desired length. I had cresta di gallo while dining out and always wanted to make it. I found the die at Pastidea and had great results. I have purchased additional ones, even a second spaghetti die that isn’t as quick as the KitchenAid one, but creates that wonderful texture you get from a brass die. I have no connections to this company, but wanted to share my discovery with others.
Thank you for sharing! I agree, I have several pasta dies from Pastidea and love the bronze ones! The only thing I’ll caution is using a sharp knife to cut short pasta. I scrapped some of the bronze off and it got into the pasta. My order from them came with a bench scraper, which works great and doesn’t damage the die. They actually released new dies that work with the KitchenAid cutter! I haven’t tried these yet but will be placing an order soon.
I usually make your Whole Wheat Exturded Pasta Dough recipe which we love. I also made this recipe before, which I find light and delicious. I have a question. I do a lot of baking including breads and know that different seasons, which can be dry in the winter and humid in the Spring/Summer months, can have an effect on recipes. Is pasta dough the same? I ask because when I made this recipe in the past the dough came out perfect, like sand. This time I was having a problem with the dough being moist and coming together and I had to add more Semolina. I use the same scale every time along with my kitchen aid pasta extruder, but the weather has been rainy and humid. Thought maybe this could be the cause.
You are absolutely correct, weather and humidity do play a factor just like bread baking. While the weight will get you there majority of the time, you may have to adjust based on humidity.
Should I substitute Semolina or 00 flour for Semola?
Semolina would be a safe substitute. Depending on the grind size you may need more or less water.
Marc,
What speed do you run the KitchenAid mixer at when extruding pasta through the kitchenAid pasta press?
I put it on 10 when extruding the dough.
Thank you Marc.
I will do that